


A problem most development teams deal with is trying to set up their application in a new environment. Whether they have new developers or Quality Assurance(QA) testers that just want to get the application running. A lot of time is spent trying to install the right version of dependencies and troubleshooting environment issues.
With Docker, the entire application can be isolated in a container ported from machine to machine. Thus, we can “build once, run anywhere,” and testers/developers will only have to install Docker and run a few commands to get the application running. New developers will be able to rapidly begin developing without worrying about their dependencies and environment. In this article, I will explain a typical development workflow with Docker.
PREREQUISITES
This article requires you to have a basic knowledge of docker commands, HTML and JavaScript. Also, make sure to have Docker installed on your machine. You can install it here
WORKFLOW OVERVIEW
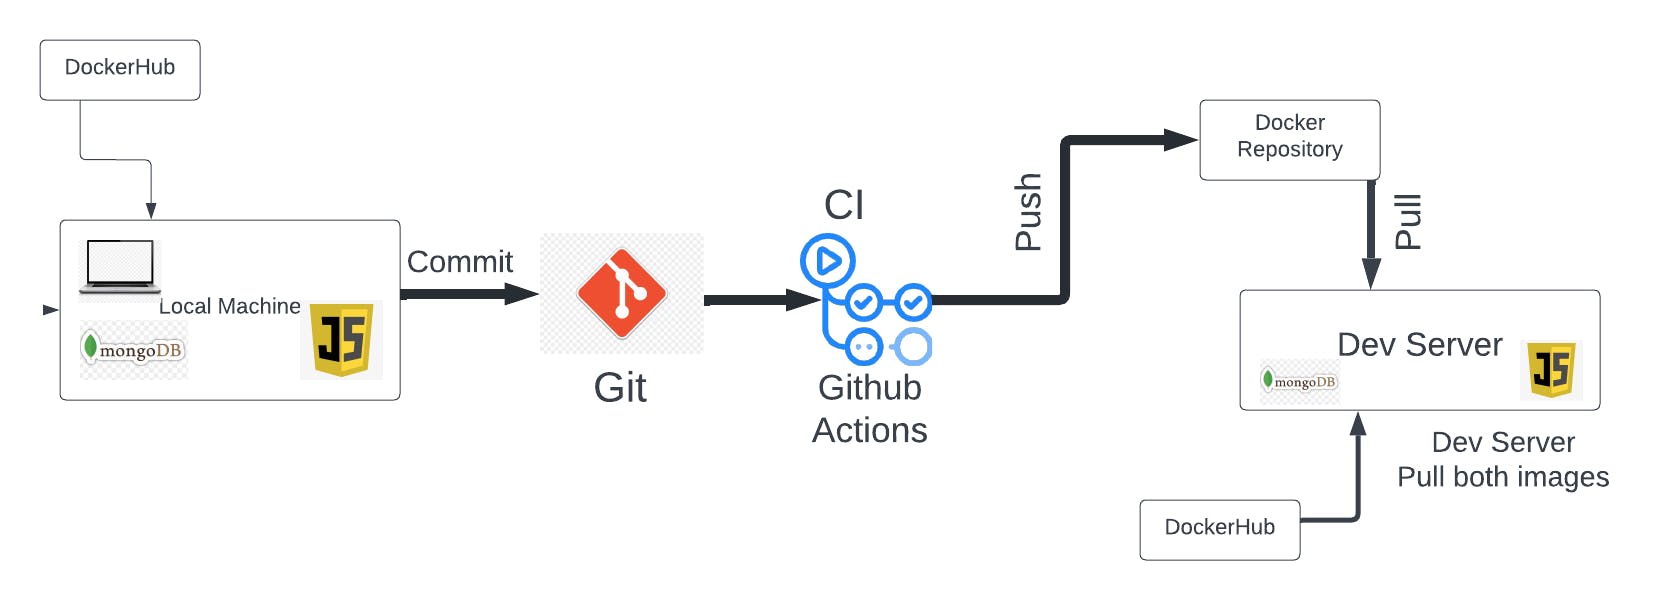
The workflow starts on our local machine where we will build a simple pet profile application using HTML and JavaScript for Frontend, NodeJs for the backend and MongoDB for the database. Then we commit our code to the Git repository where a CI pipeline will be triggered to build our application's container image and push it to a docker repository. Then the application can be pulled and run from the Dev Server(This can be other developers or QA testers in the team).
You can have access to all the codes used in this article in this repository
LOCAL DEVELOPMENT
Initializing The Project
Create a new folder named simple-profile-app, then create another folder named app inside, which will contain the application files only and then create the following files inside of it.
package.json
index.html
server.js
.gitignore
Paste the below code in the package.json file, this will allow us to install all the dependencies with just npm install
    {
    "name": "developing-with-docker",
    "version": "1.0.0",
    "description": "",
    "main": "server.js",
    "scripts": {
      "test": "echo \"Error: no test specified\" && exit 1",
      "start": "node server.js"
    },
    "author": "Your name",
    "license": "ISC",
    "dependencies": {
      "body-parser": "^1.19.0",
      "express": "^4.17.1",
      "mongodb": "^3.3.3"
    }
  }
Then run npm install in the terminal to install all the dependencies
Backend Code
Open the server.js file and paste in the following:
let express = require('express');
let path = require('path');
let fs = require('fs');
let MongoClient = require('mongodb').MongoClient;
let bodyParser = require('body-parser');
let app = express();

app.use(bodyParser.urlencoded({
  extended: true
}));
app.use(bodyParser.json());

app.get('/', function (req, res) {
    res.sendFile(path.join(__dirname, "index.html"));
  });

// use when starting application locally
let mongoUrlLocal = "mongodb://admin:password@localhost:27017";

// use when starting application as docker container
let mongoUrlDocker = "mongodb://admin:password@mongodb";

// pass these options to mongo client connect request to avoid DeprecationWarning for current Server Discovery and Monitoring engine
let mongoClientOptions = { useNewUrlParser: true, useUnifiedTopology: true };

let databaseName = "my-db";

app.post('/update-profile', function (req, res) {
  let userObj = req.body;

  MongoClient.connect(mongoUrlLocal, mongoClientOptions, function (err, client) {
    if (err) throw err;

    let db = client.db(databaseName);
    userObj['petid'] = 1;

    let myquery = { petid: 1 };
    let newvalues = { $set: userObj };

    db.collection("pets").updateOne(myquery, newvalues, {upsert: true}, function(err, res) {
      if (err) throw err;
      client.close();
    });

  });
  // Send response
  res.send(userObj);
});

app.get('/get-profile', function (req, res) {
  let response = {};
  // Connect to the db
  MongoClient.connect(mongoUrlLocal, mongoClientOptions, function (err, client) {
    if (err) throw err;

    let db = client.db(databaseName);

    let myquery = { petid: 1 };

    db.collection("pets").findOne(myquery, function (err, result) {
      if (err) throw err;
      response = result;
      client.close();

      // Send response
      res.send(response ? response : {});
    });
  });
});

app.listen(3000, function () {
  console.log("app listening on port 3000!");
});
Here, we created a NodeJs app that connects to the database my-db and runs on port 3000. It has endpoints /get-profile and /update-profile to get and update the pet profile respectively.
Frontend Code
Open index.html and paste the following:
<html lang="en">
<style>
    .container {
        margin: 40px auto;
        width: 80%;
    }
    .button {
        width: 160px;
        height: 45px;
        border-radius: 6px;
        font-size: 15px;
        margin-top: 20px;
    }
    img {
        width: 328px;
        height: 287px;
        display: block;
        margin-bottom: 20px;
    }
    hr {
        width: 400px;
        margin-left: 0;
    }
    h3 {
        display: inline-block;
    }
    #container {
        display: none;
    }
    #container-edit {
        display: none;
    }
    #container-edit input {
        height: 32px;
    }
    #container-edit hr {
        margin: 25px 0;
    }
    #container-edit input {
        width: 195px;
        font-size: 15px;
    }
</style>
<script>
    (async function init() {
        const response = await fetch('http://localhost:3000/get-profile');
        console.log("response", response);
        const pet = await response.json();
        console.log(JSON.stringify(pet));

        document.getElementById('name').textContent = pet.name ? pet.name : 'Leo';
        document.getElementById('age').textContent = pet.age ? pet.age : '4';
        document.getElementById('feed').textContent = pet.feed ? pet.feed : 'canned food';

        const cont = document.getElementById('container');
        cont.style.display = 'block';
    })();

    async function handleUpdateProfileRequest() {
        const contEdit = document.getElementById('container-edit');
        const cont = document.getElementById('container');

        const payload = {
            name: document.getElementById('input-name').value,
            age: document.getElementById('input-age').value,
            feed: document.getElementById('input-feed').value
        };

        const response = await fetch('http://localhost:3000/update-profile', {
            method: "POST",
            headers: {
              'Accept': 'application/json',
              'Content-Type': 'application/json'
            },
            body: JSON.stringify(payload)
        });
        const jsonResponse = await response.json();

        document.getElementById('name').textContent = jsonResponse.name;
        document.getElementById('age').textContent = jsonResponse.age;
        document.getElementById('feed').textContent = jsonResponse.feed;

        cont.style.display = 'block';
        contEdit.style.display = 'none';
    }

    function updateProfile() {
        const contEdit = document.getElementById('container-edit');
        const cont = document.getElementById('container');

        document.getElementById('input-name').value = document.getElementById('name').textContent;
        document.getElementById('input-age').value = document.getElementById('age').textContent;
        document.getElementById('input-feed').value = document.getElementById('feed').textContent;

        cont.style.display = 'none';
        contEdit.style.display = 'block';
    }
</script>
<body>
    <div class='container' id='container'>
        <h1>Pet Profile</h1>
        <span>Name: </span><h3 id='name'>Leo</h3>
        <hr />
        <span>Age: </span><h3 id='age'>4</h3>
        <hr />
        <span>Feed: </span><h3 id='feed'>canned food</h3>
        <hr />
        <button class='button' onclick="updateProfile()">Edit Profile</button>
    </div>
    <div class='container' id='container-edit'>
        <h1>Pet Profile</h1>
        <span>Name: </span><label for='input-name'></label><input type="text" id='input-name' value='Leo' />
        <hr />
        <span>Age: </span><label for='input-age'></label><input type="number" id='input-age' value={4} />
        <hr />
        <span>Interests: </span><label for='input-feed'></label><input type="text" id='input-feed' value='canned food' />
        <hr />
        <button class='button' onclick="handleUpdateProfileRequest()">Update Profile</button>
    </div>
</body>
</html>
This is the HTML that gets rendered in the Nodejs app. We have a <script> section that contains the Javascript that connects to the endpoints to get and update the pet profile. Also, we have a <style> section where we style the application.
Database Configuration
We will use MongoDB for the database and mongo-express to set up our database in a web-based format so that we don't have to run many commands
Since we are using Docker, we will run MongoDB and mongo-express in a container rather than installing them locally. To make our work easier, we will run both MongoDB and mongo-express together using docker-compose, this will save us the stress of creating a network and running them individually.
Create a docker-compose.yaml file in the simple-app directory and paste the following:
version: '3'
services:
  mongodb:
    image: mongo
    restart: always
    ports:
      - 27017:27017
    environment:
      - MONGO_INITDB_ROOT_USERNAME=admin
      - MONGO_INITDB_ROOT_PASSWORD=password
    volumes:
      - mongo-data:/data/db
  mongo-express:
    image: mongo-express
    restart: always # fixes MongoNetworkError when mongodb is not ready when mongo-express starts
    ports:
      - 8081:8081
    environment:
      - ME_CONFIG_MONGODB_ADMINUSERNAME=admin
      - ME_CONFIG_MONGODB_ADMINPASSWORD=password
      - ME_CONFIG_MONGODB_SERVER=mongodb
      - ME_CONFIG_MONGODB_URL=mongodb://admin:password@mongo:27017/
volumes:
  mongo-data:
    driver: local
Let's take a closer look at what's happening here. Here we are using the version 3 compose file.
In the **mongodb** service we specify the mongo image without a tag, which means we are using the :latest version, we can use other versions by specifying it. We specify the user and password using the environment variables MONGO_INITDB_ROOT_USERNAME and MONGO_INITDB_ROOT_PASSWORD. We are writing the user and password directly for simplicity, we might need to specify our password and username in a .env file which will be injected into the environment variables. this will secure our credentials if we commit to a public repository. Every time a container is stopped, its data is removed. Thus we need to store the database locally on /data/db. This syntax is [host]: [container].
mongo-data:/data/db
This means any data from mongo-data is stored on /data/db. We will use the same syntax for the ports
 ports:
      - 27017:27017
In the mongo-express service, we do the same thing we did in the mongodb service by specifying the container image, user, password and the ports to :8081. We also specify the database server to connect to using ME_CONFIG_MONGODB_SERVER by setting it to mongodb. We also define it to have restart: always. This means that it will restart whenever it fails, in case mongodb is not up yet.
Now let's run both containers using docker-compose. Make sure to have docker-compose installed. Run this command in the terminal inside the simple-app directory
sudo docker-compose up
Then open up localhost:8081 to see the mongo-express running. You should see something like this:
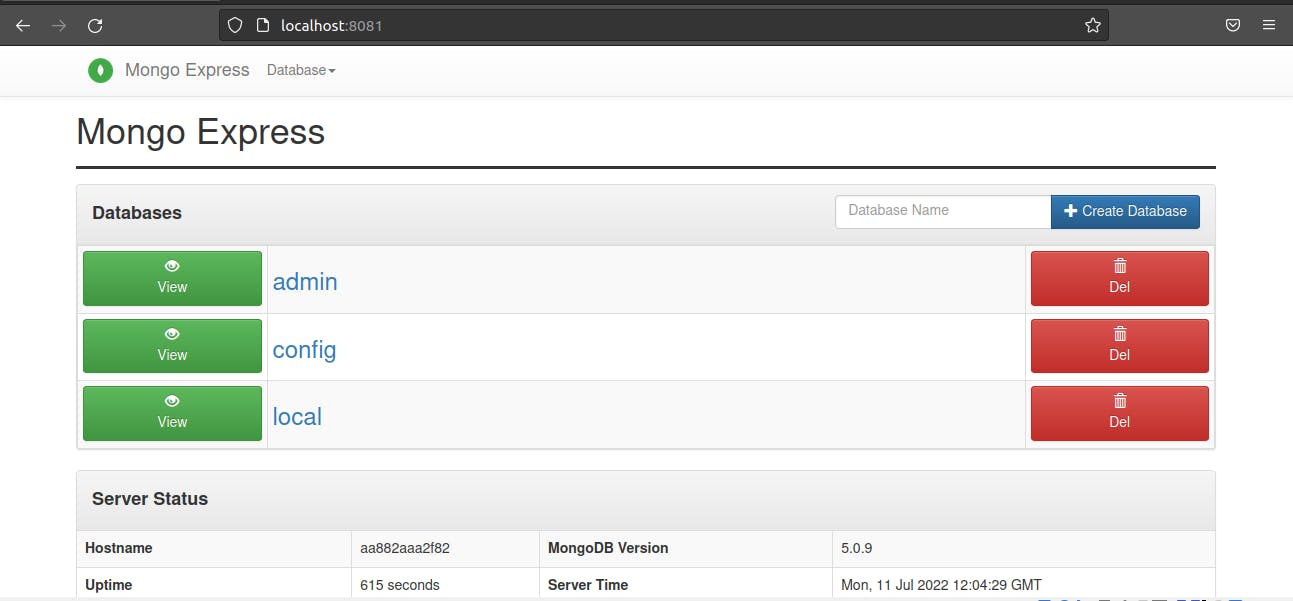
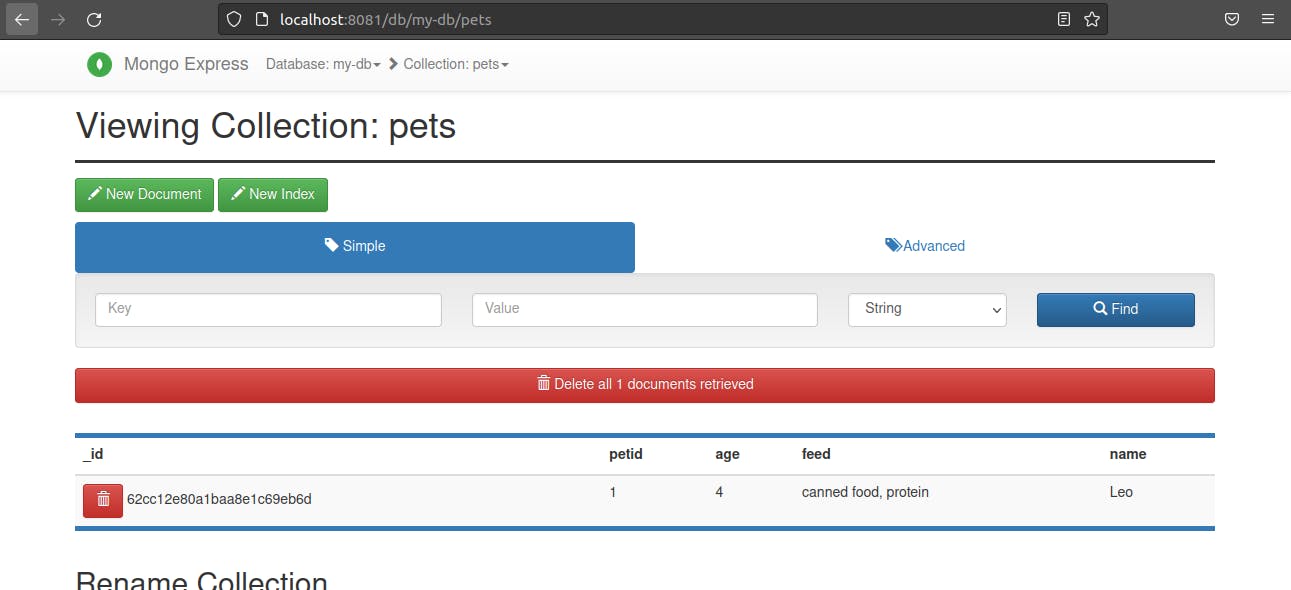
Recall in our server.js file, we specify the databaseName to be my-db and collections to be pets. We will create that now using the mongo-express UI. Create a new database named my-db and create a collection inside the database named pets.
Now let's start our application. Navigate into the simple-app/app directory and run this command to start the application:
node server.js
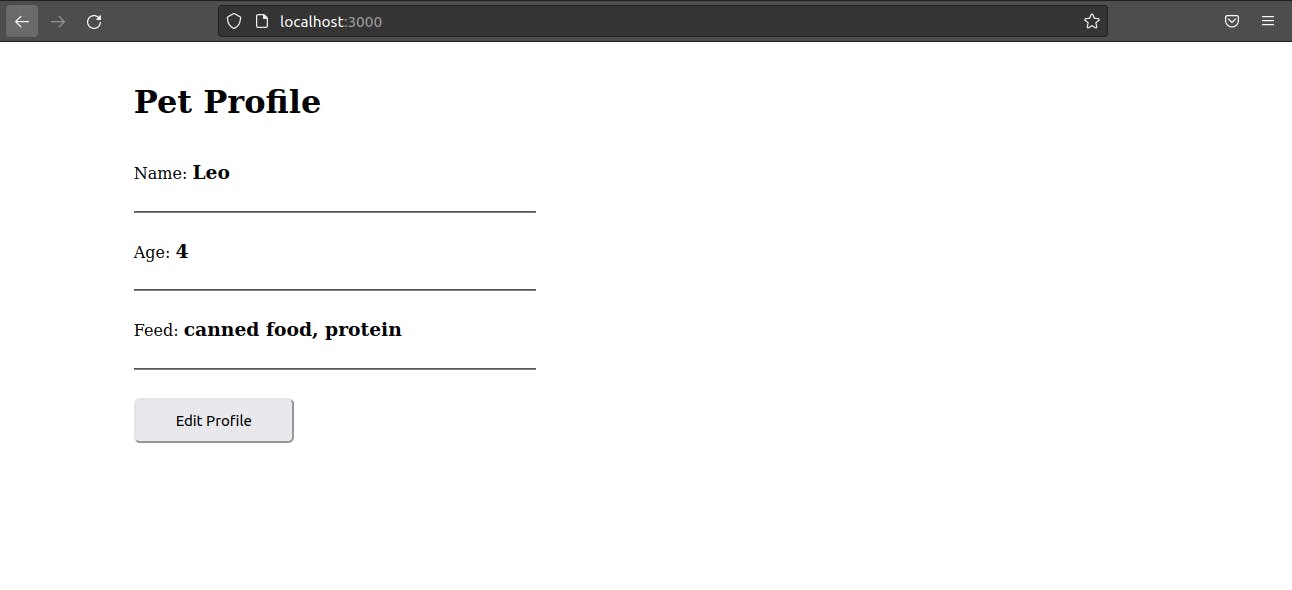
Then open up localhost:3000 to see the app running, you should have something like this:
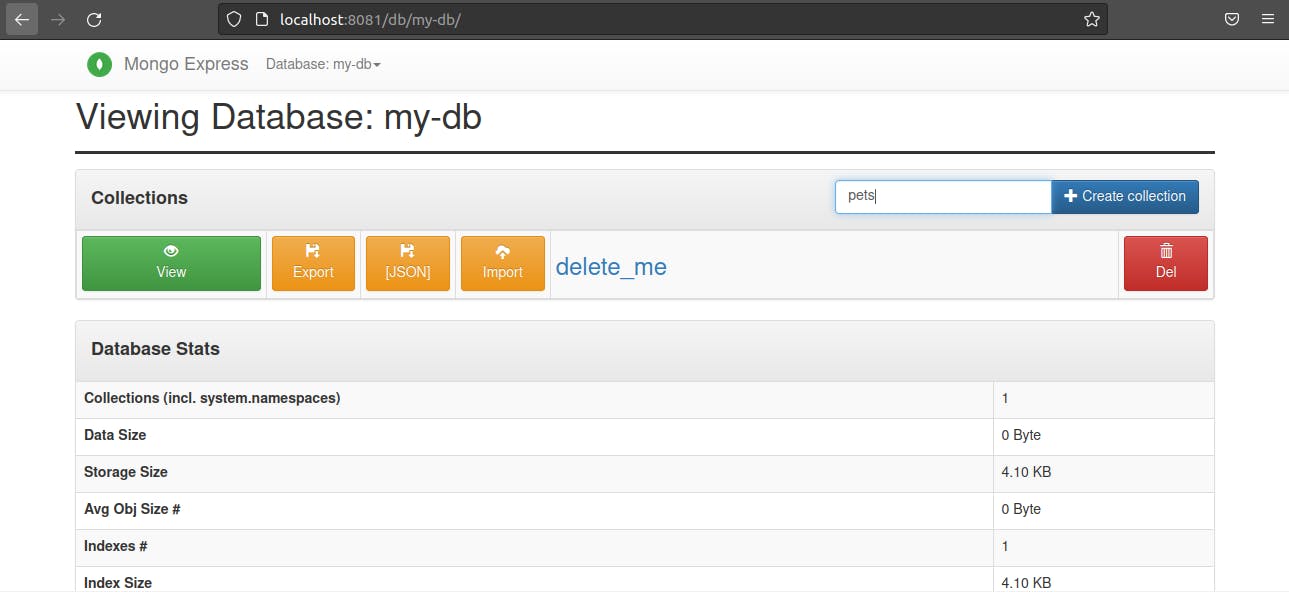
Let's try editing the profile by clicking on the edit profile button and update after editing. Voila!!, the edit works, also let's check the database to see if the data was stored. Open the mongo-express and click the my-db on the collection to see the data stored, you should see something like this:
Now, our app is working fine locally. We can view and update the pet profile.
Containerization
The next step is to build a docker image of the application. To do this, we need to create a DockerFile where we will specify the configuration of the image.
Create a file named Dockerfile in the simple-app directory and paste the following:
FROM node:16-bullseye-slim
# Specify the version of node we are using for the application

EXPOSE 3000
# expose application to port 3000

RUN mkdir -p /home/simple-profile-app
# use the RUN command to create a new directory in the application image where our application would reside

COPY ./app /home/simple-profile-app
# copy our local application directory and files to the new directory we created in the image

WORKDIR /home/simple-profile-app
# set default dir so that next commands executes in /home/simple-profile-app dir

RUN npm install
# will run npm install in /home/profile-app to install all the dependencies of the application

CMD ["node", "server.js"]
# start the application by runnning `node server.js` in the WORKDIR
Now we can run the docker build command in this directory to build the application image, but we will set up a Continous Integration(CI). This CI will build the docker image of the application and push it to a container registry anytime we make a push to our repository. This will aid automation and faster development.
Also, we should replace mongoUrlLocal with mongoUrlDocker in all occurrences in server.js so the application can use the mongo container's port when it's running in the container. Our final server.js should look like this.
let express = require('express');
let path = require('path');
let fs = require('fs');
let MongoClient = require('mongodb').MongoClient;
let bodyParser = require('body-parser');
let app = express();

app.use(bodyParser.urlencoded({
  extended: true
}));
app.use(bodyParser.json());

app.get('/', function (req, res) {
    res.sendFile(path.join(__dirname, "index.html"));
  });

// use when starting application locally
let mongoUrlLocal = "mongodb://admin:password@localhost:27017";

// use when starting application as docker container
let mongoUrlDocker = "mongodb://admin:password@mongodb";

// pass these options to mongo client connect request to avoid Deprecation warning for current Server Discovery and Monitoring engine
let mongoClientOptions = { useNewUrlParser: true, useUnifiedTopology: true };

let databaseName = "my-db";

app.post('/update-profile', function (req, res) {
  let userObj = req.body;

  MongoClient.connect(mongoUrlDocker, mongoClientOptions, function (err, client) {
    if (err) throw err;

    let db = client.db(databaseName);
    userObj['petid'] = 1;

    let myquery = { petid: 1 };
    let newvalues = { $set: userObj };

    db.collection("pets").updateOne(myquery, newvalues, {upsert: true}, function(err, res) {
      if (err) throw err;
      client.close();
    });

  });
  // Send response
  res.send(userObj);
});

app.get('/get-profile', function (req, res) {
  let response = {};
  // Connect to the db
  MongoClient.connect(mongoUrlDocker, mongoClientOptions, function (err, client) {
    if (err) throw err;

    let db = client.db(databaseName);

    let myquery = { petid: 1 };

    db.collection("pets").findOne(myquery, function (err, result) {
      if (err) throw err;
      response = result;
      client.close();

      // Send response
      res.send(response ? response : {});
    });
  });
});

app.listen(3000, function () {
  console.log("app listening on port 3000!");
});
Continuous Integration (CI)
We will set up a Github Action workflow that builds the application image and push it to a container registry. We will be using Docker Hub as our registry. You might want to set your image repository to be private on Dockerhub or push your docker image to Amazon ECR(Elastic Container Registry) so that your application images are not available to the public. Here is a tutorial on how to set up the CI workflow with ECR.
Firstly, we create a repository on Docker Hub. You might need to login first
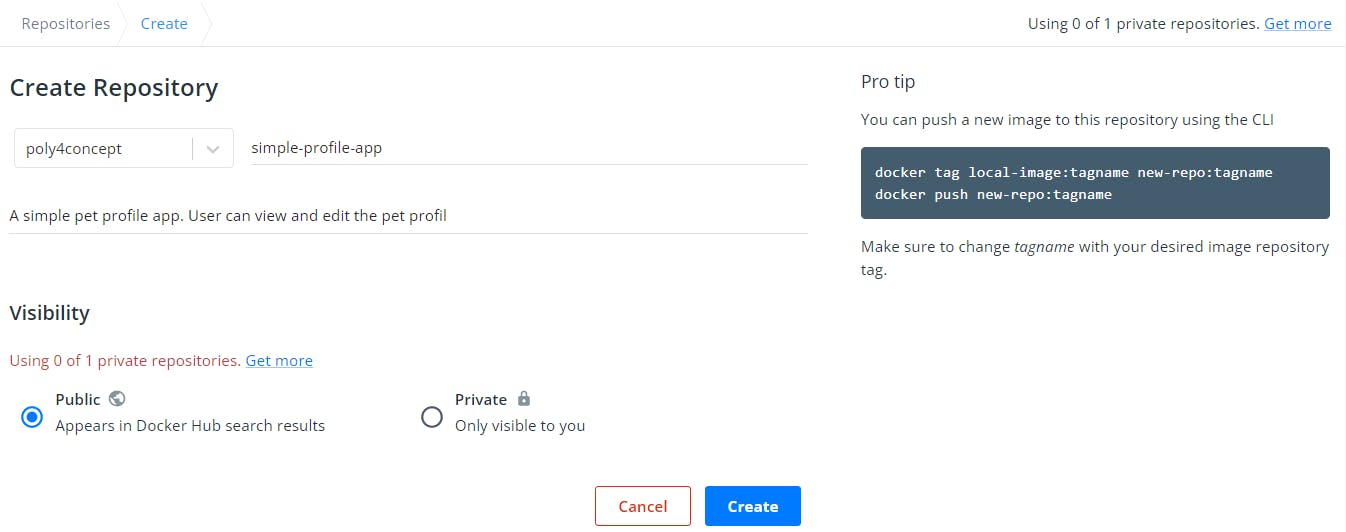
Here, we are setting the visibility to Public for simplicity. You might want to set it to private to allow only your team to access and pull it.
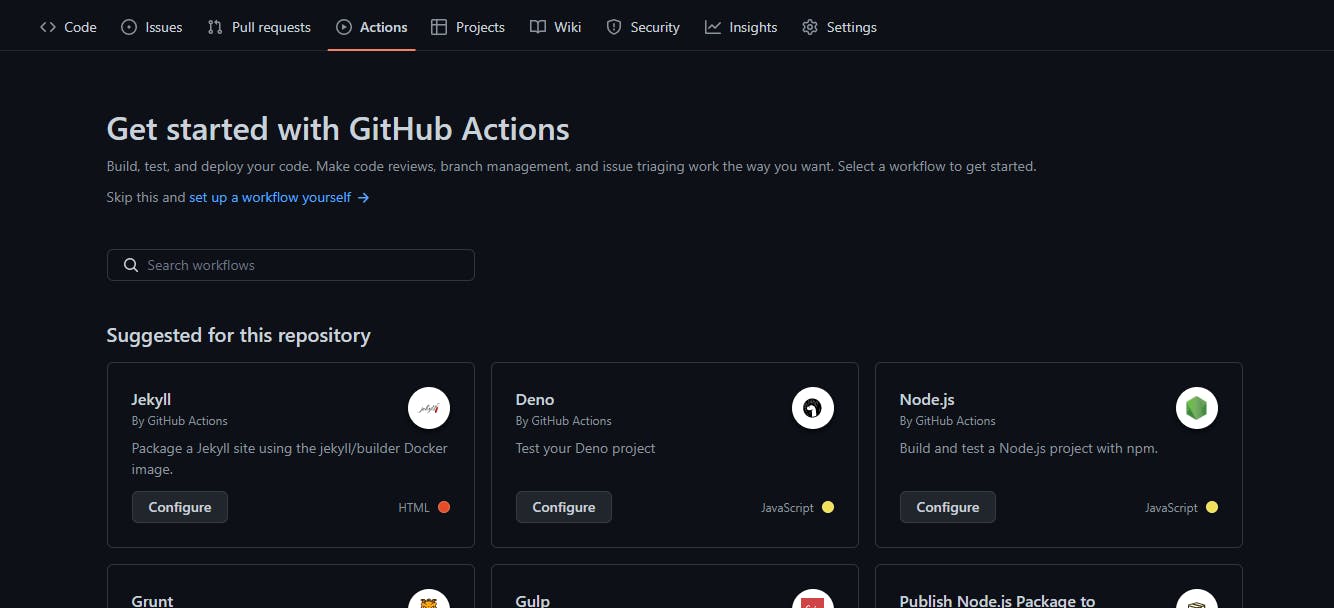
Now, let's create the CI workflow. Go to the Actions tab on your GitHub repository and click on the set up new workflow yourself
This will bring up a text editor where we can write our pipeline like this:
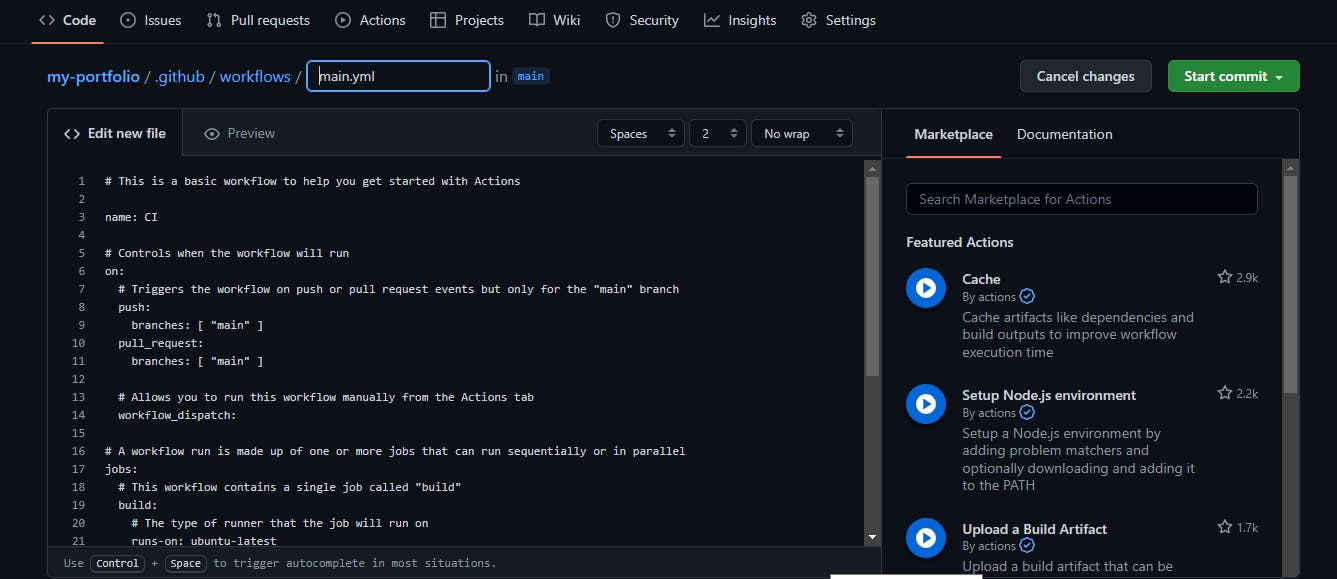
Replace the content of the main.yaml file with the following:
name: Deploy to Docker Hub

on:
  push:
    branches:
      - 'main'
  pull_request:
    branches:
      - main

jobs:
  docker:
    runs-on: ubuntu-latest
    steps:
      -
        name: Set up QEMU
        uses: docker/setup-qemu-action@v2
      -
        name: Set up Docker Buildx
        uses: docker/setup-buildx-action@v2
      -
        name: Login to DockerHub
        uses: docker/login-action@v2
        with:
          username: ${{ secrets.DOCKERHUB_USERNAME }}
          password: ${{ secrets.DOCKERHUB_TOKEN }}
      -
        name: Build and push
        uses: docker/build-push-action@v3
        with:
          push: true
          tags:  YOUR_DOCKER_USERNAME/simple-profile-app:latest
To push to the DockerHub, we need to set the token and username. Since these are credentials we can’t reveal them in public hence need to put them as Environment Variables which are hidden and secured in the environment. So, go to the setting menu of your repository and in that click on the secrets dropdown and then click on actions.
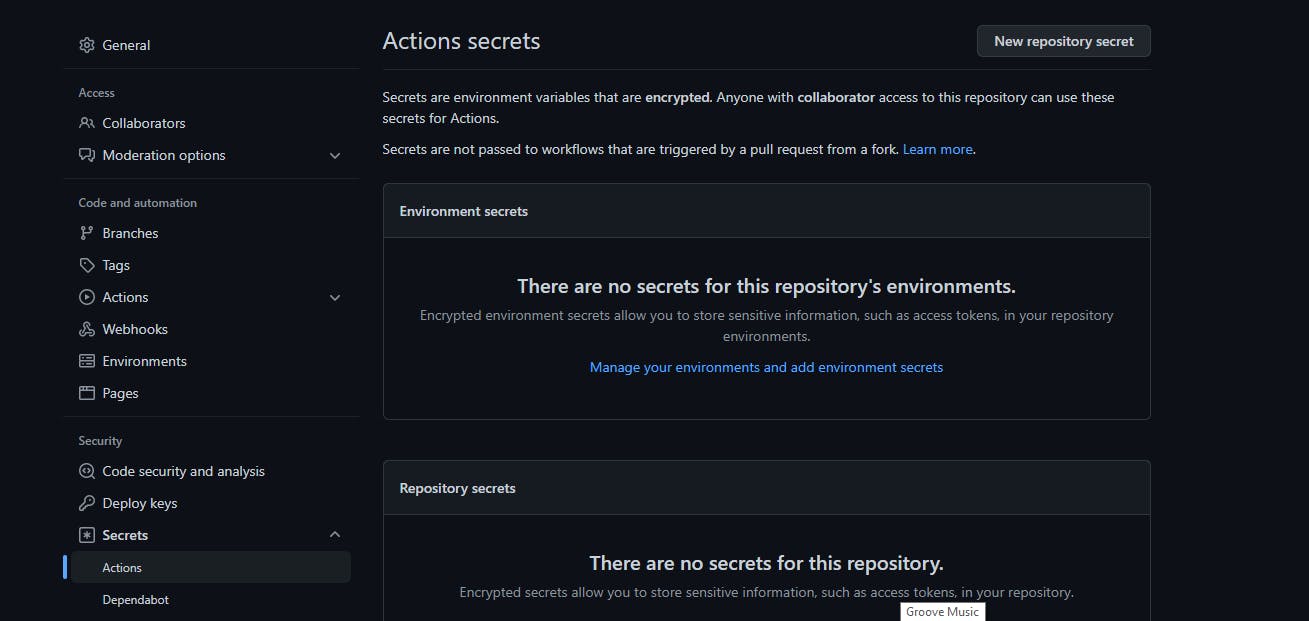
Then simply add DOCKERHUB_USERNAME and DOCKERHUB_TOKEN as your username and password respectively.
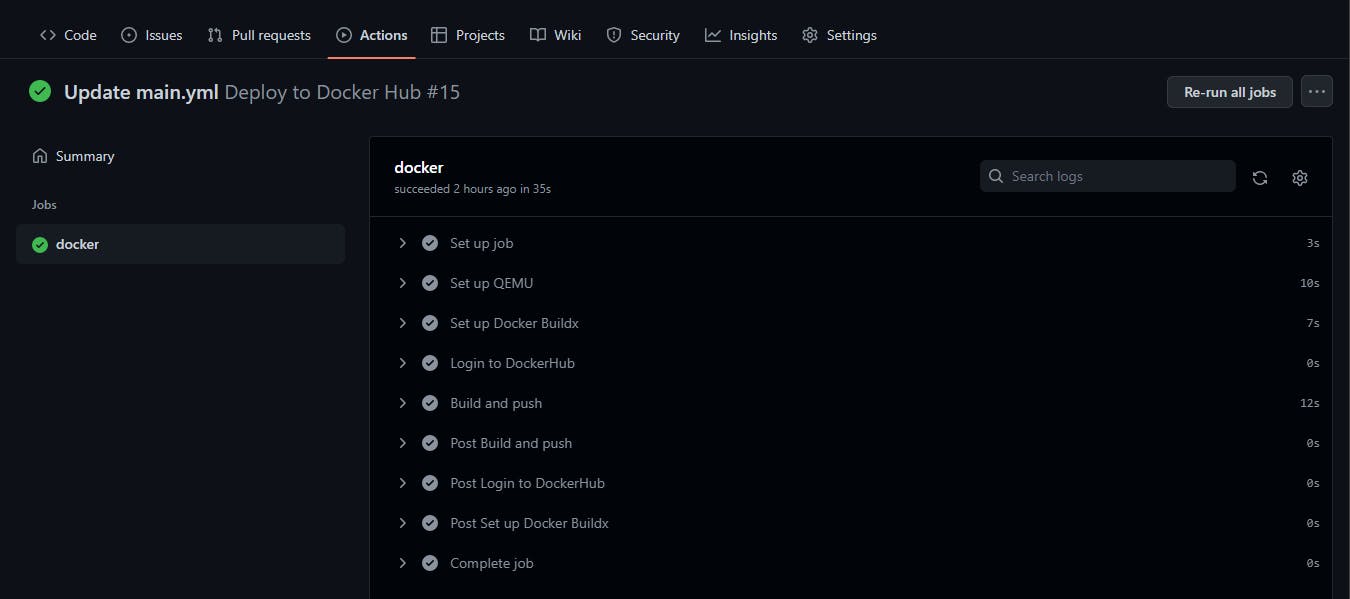
Now whenever a push or pull request is made to the main branch, the workflow will be triggered and the image will be built and pushed to Dockerhub
Dev Server
We have set up an automation to containerize our application on push to the repository. Now we need to update our docker-compose file to run the application with all the dependencies.
Let's replace the content of the docker-compose file with the following:
version: '3'
services:
  my-app:
    image: YOUR_DOCKER_USERNAME/simple-profile-app
    restart: always
    ports:
      - 3000:3000
    depends_on:
      - mongodb
   #volumes:
    # - ./app:/home/simple-profile-app
  mongodb:
    image: mongo
    restart: always
    ports:
      - 27017:27017
    environment:
      - MONGO_INITDB_ROOT_USERNAME=admin
      - MONGO_INITDB_ROOT_PASSWORD=password
    volumes:
      - mongo-data:/data/db
  mongo-express:
    image: mongo-express:0.54
    restart: always # fixes MongoNetworkError when mongodb is not ready when mongo-express starts
    ports:
      - 8081:8081
    environment:
      - ME_CONFIG_MONGODB_ADMINUSERNAME=admin
      - ME_CONFIG_MONGODB_ADMINPASSWORD=password
      - ME_CONFIG_MONGODB_SERVER=mongodb
volumes:
  mongo-data:
    driver: local
Here, we have added the application image to the file, so when we run docker-compose up, it pulls the application image from Dockerhub. Also, we specify the app to run on port 3000 and note that it depends on the mongodb image. We also mount the volume just like we did with mongodb. This will ensure that changes made locally can reflect on the application running in the container. It is commented out because it will only be needed when we make changes locally.
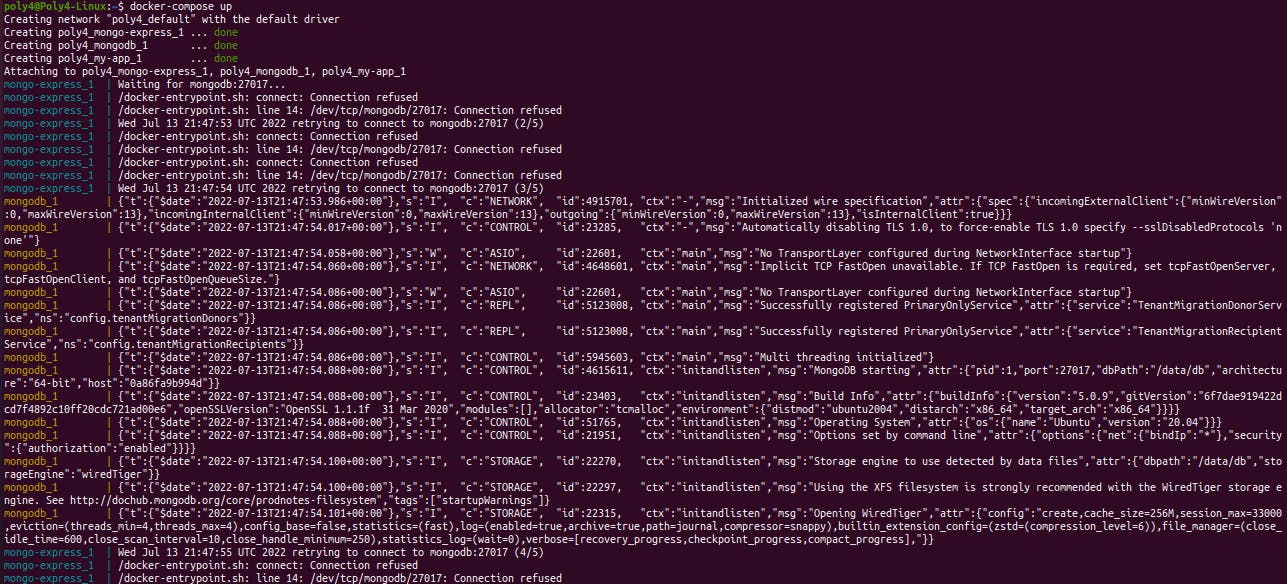
With the docker-compose.yaml file, a QA tester or anyone that just wants to have the app running locally can do so by running this command in the same directory with the docker-compose.yaml file:
sudo docker-compose up
Something like this should be the output:
The tester can now access mongo-express UI on localhost:8081, create a new database my-db and new collection pets in the database my-db. After which, the app will be accessible on localhost:3000.
Also, other developers that want to edit the code will just have to pull the code from the git repository, uncomment the volumes in the docker-compose file and start the application using:
sudo docker-compose up
When changes are made, they will reflect on the running application. After they make all their changes, all they have to do is push to the repository and the CI workflow will be triggered to build the application image again, and the workflow will continue this way.
Conclusion
In this article, we built a typical development workflow with docker. We set up the application locally, set up a CI pipeline that builds the application image and pushes it to Dockerhub and creates a docker-compose file to run the application with all its dependencies anywhere.
Thank you for reading
I appreciate the time we spent together. I hope this content will be more than just text. Follow me on Linkedin and subscribe to my Youtube Channel where I plan to share more valuable content. Also, Let me know your thoughts in the comment section.